Tag Archives: food colouring

for the love of dye…

Dying wool to your own specific colourway is so much fun, and it’s really easy! I love using food colouring to dye wool, and over the weekend, my friend Nyome and I had a blast doing just that! I’ve written posts on dying wool before, but I’ll outline the basics for you.

To get the best results, start with 100% wool. My #1 go-to wool is Bendigo Woollen Mills Luxury, in Frost. The balls are a missive 200g, and the wool is gorgeous and soft. Wind the ball into a skein (we used the edge of Nyome’s dining table!), and tie it off in at least 4 places. This will reduce the risk of the skein getting tangled (which is an utter nightmare!). Then, soak the wool in warm water, with a bit of white vinegar for half an hour. I added about 1 to 1.5 cups of vinegar to the water, but we were soaking 800g of wool in a massive sink!

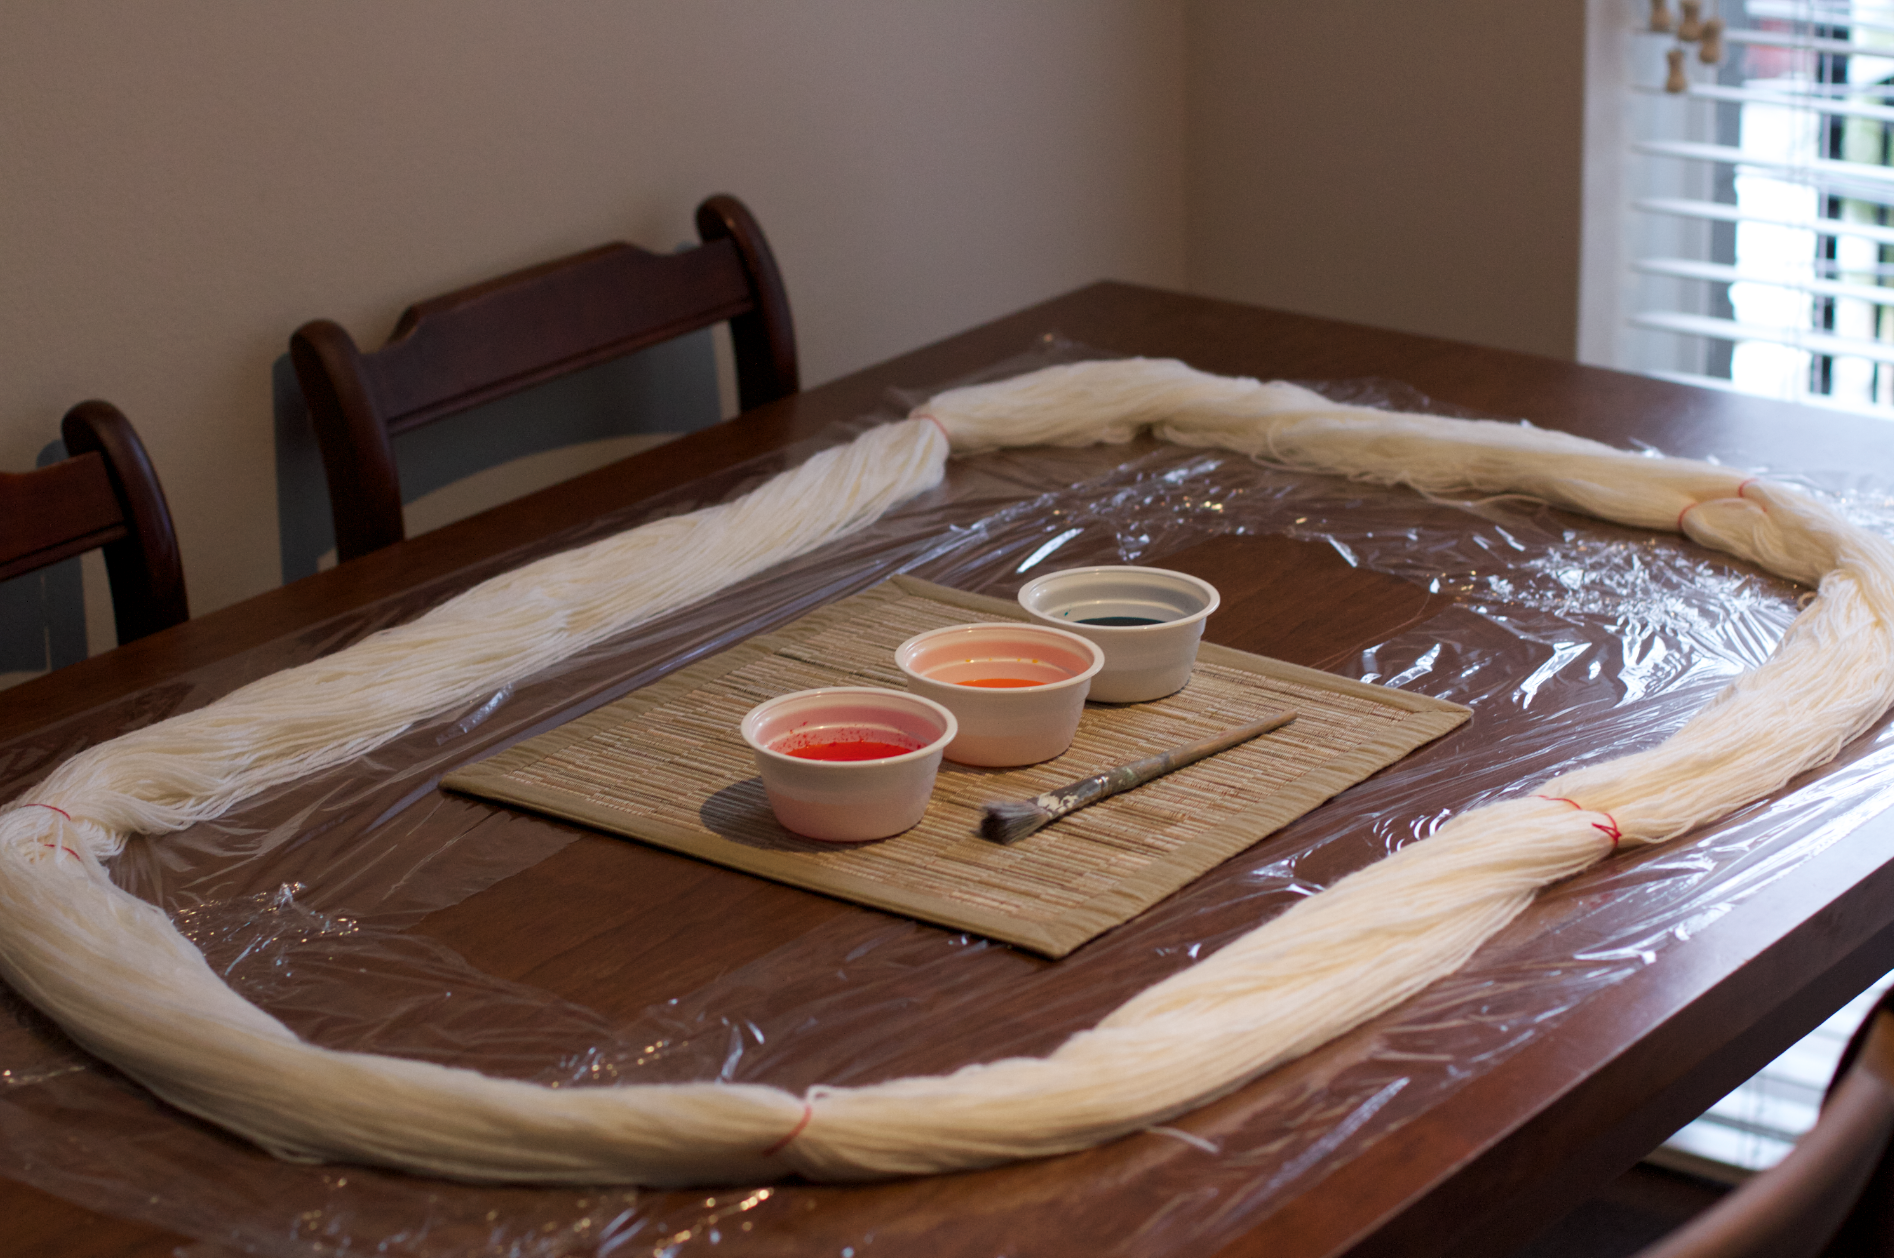
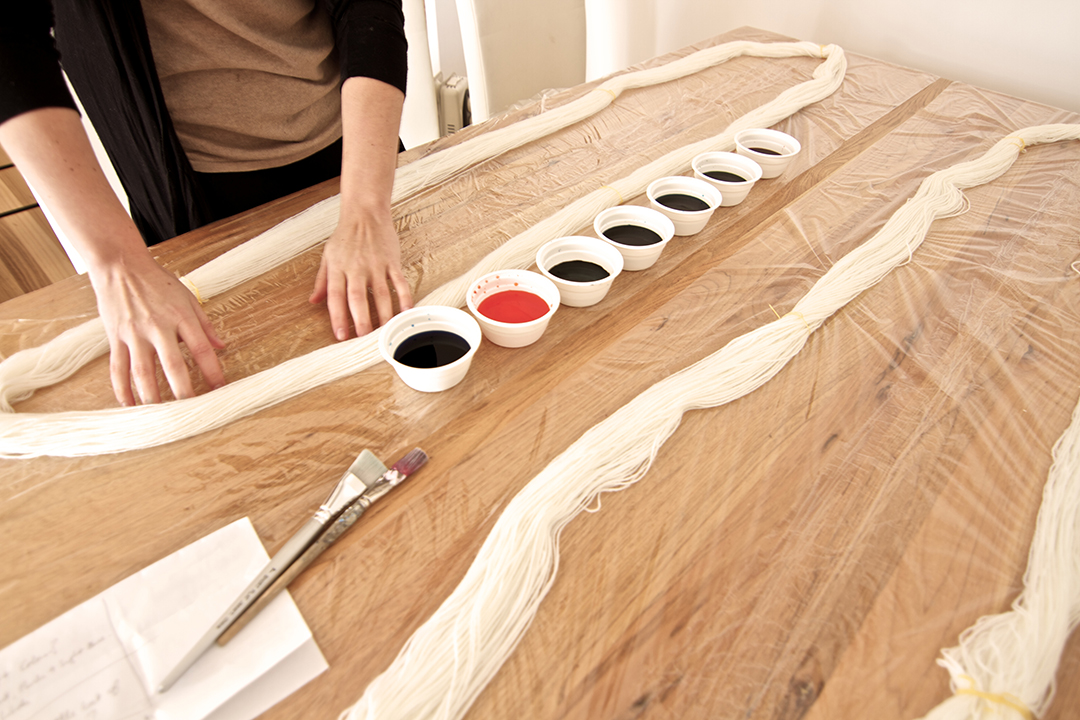
 While the wool soaks, you can get started on your dyes. I like to use good quality gel food dye, which you can get some cooking supply stores. Put a small amount into a container (a little goes a long way!), add warm water, and stir to dissolve. The more water you add, the paler the colour will be. Grab your skein, and squeeze as much of the water out as you can. You want it damp, not dripping. Lay it out flat onto of some cling wrap.

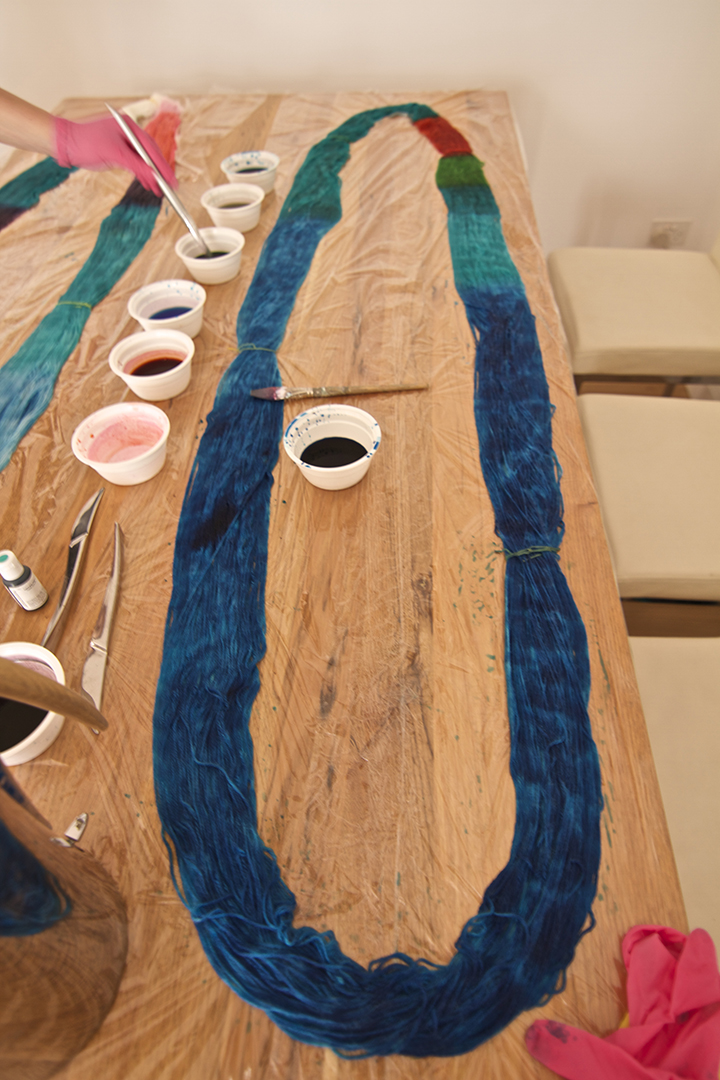
Now for the fun part! Paint your wool! There really isn’t any hard and fast technique to this, just apply the dye with a paint brush, and (using a gloved hand!) squish the dye into the layers of wool. Once one side is completely painted, you will have to carefully flip the skein and paint the underside.

When you’re happy with the skein, carefully wrap it up using the cling wrap that it was sitting on. You want to make a neat, tight little parcel. Pop the parcel into a slow cooker to set the dye. Mine has a little wire tray in it, so the cling wrap doesn’t sit directly on the pan. I also make sure to put about 1.5cm of water in the cooker, to make some lovely hot steam. Cook your wool for 1 hour on a high heat.

After an hour, carefully remove the parcel from the slow cooker, and let it cool down before you unwrap it. That parcel is going to be full of hot steam, which can give a really nasty burn, so please just be patient!

When it’s cool, unwrap it and give it a gentle wash in warm water with a bit of wool wash (or shampoo). There should be little to no dye coming out of that wool, which is exactly what you want. Rinse, squeeze out the excess water, and let it dry. Once it’s dry, you can rewind into different sized skeins, to really show off your colour choices!

This really is a lot of fun, and it’s so simple! Now I have to decide what to make with my fantastic wool!

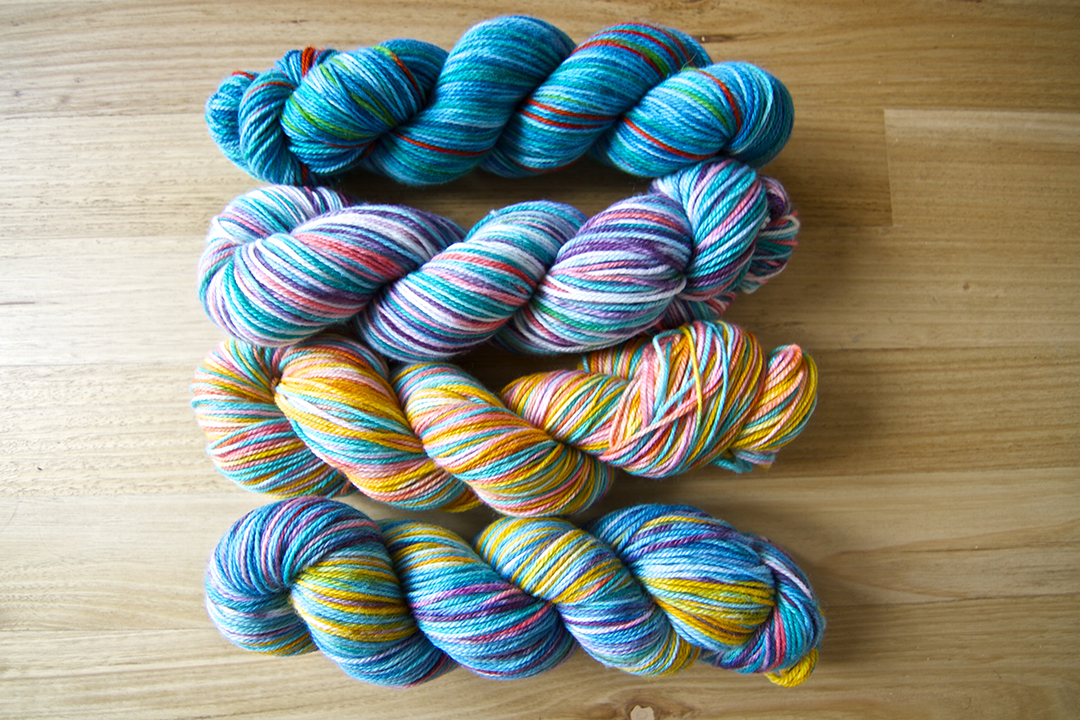
TOP: Sea Glass / UPPER: Bubblegum Pastels / LOWER: Unicorn Dreams / BOTTOM: Paddle-Pop

dyeing wool with food colouring…

I’ve done this a few times before (see here), but I’ve never dyed 100% wool, and I was really excited to see how it would turn out. Food colouring is a brilliant way to dye, it doesn’t need any nasty chemicals, it’s quick, and the clean up is easy. The only problem is, this method will only work on a yarn that has some animal fibre content. If you want to dye cotton or 100% acrylic, it’s not going to work! So stick with something that has at least 60% wool.

I purchased 2 balls of Luxury wool from Bendigo Woollen Mills in the shade Frost. It’s a gorgeous wool, and not at all scratchy (these balls are huge, 200g each!) This wool is great to use if you’re dying for the first time, as it is machine washable, which brings the chance of felting your wool down significantly! First, I used the edge of my dining table to turn the balls into one huge skein. I used scrap pink cotton to secure the skein in about 5 places, so it wouldn’t tangle.

Now to prepare the wool for dyeing. I put the entire skein into a large saucepan and slowly added enough warm water to cover, making sure I squished the wool down to force the water in. Don’t be alarmed by the next photo, that’s just warm water from the tap coming out of my kettle, not boiling!

When the wool was well soaked, I added 1.5 cups of white vinegar. This is really important! It prepares the wool for the dye and helps it to stick. I squished the wool again to move the vinegar around. Let it soak for at least half an hour.

 While you wait, you can make your dyes! I used AmeriColor soft gel food colouring I found at Victoria’s Basement, in Turquoise, Holiday Red and Egg Yellow. You can use any food colouring you want, but I find that the stuff you buy at a cake decorating store (or similar) has a higher pigmentation solution. To a little container (far left) I added a squirt of colour, 1 tablespoon of white vinegar, and about half a cup of warm water. Stir to dissolve.

Take your wool and squeeze as much of the water out as you can. You want it to be damp, but not dripping. Set it out on your surface on top of some cling wrap. Now the fun begins! I know what I’m making with this wool, so I knew exactly where and how I wanted my colours. I wanted the end result to be mostly white, with splashes of colour. Just grab a paint brush and start painting! Really try to push the dye into the wool, and check the underside for white patches.

When you’ve painted the entire skein, or just the sections you want, wrap the cling wrap over and around the wool. You want to try and keep the sections away from each other, so really make sure that it is all wrapped tight.

Turn your slow cooker on and place a wire rack (or something for the upcoming dish or bowl to sit on) inside. Fill the cooker with enough water to just reach the top of the rack. Grab your cling-wrapped skein and place it in a pyrex dish or oven proof bowl. Put this on top of the rack, making sure your lid can still fit on as normal. Turn the cooker up to high, and walk away for an hour.

Try to be patient and don’t lift that lid! All of the steam in there is super hot, and working for you to make that dye set into the wool. After an hour, turn the cooker off and carefully remove the dish. Let it cool until you can handle it comfortably. Remove the cling wrap and wash the wool in a bucket or the sink with some wool wash or some gentle shampoo. When washing, you shouldn’t see too much colour coming out, a little is fine, but most of it should be stuck right into that wool.

Hang it up somewhere to dry completely (mine took about a day to dry out). Once it is dry, ball it up or skein it, and marvel at what you’ve created!

I really love doing this! It gives you a chance to be creative with colour, without much effort. I’ve already started working with this wool, and I was really surprised at how the colours are coming together. I had a much different idea in my head about how they were going to look, but I like what they are doing! It’s like they have a mind of their own!

I hope this post was helpful to anyone who wants to try dyeing for the first time, and if you have any questions, just let me know! I’m not by any means an expert, but I can always give you my opinion. Have fun!!

31.03.2014 UPDATE: If you’d like to see the finished project using this hand dyed wool, click here!